
08/09/2021
How I create my blog
Why create a blog?
There are many reasons on why to create a blog, but I think the main reason is for you share your knowledge, and don't think you don't have anything to share, everyone has.
Well, let's get to it, how I create this blog?
For this blog I used basically two tools, Angular and Scully. For me was pretty easy to create it because I have some background with Angular, but it's perfectly possible for someone that knows some coding to create one even without knowing these two tools.
I recommend you to study some Markdown in order to use all the features that Scully offers.
[IMPORTANT] I won't cover all the details and possibilities that Angular+Scully stack offers us, I'll focus only on how to create the blog and put it online using the same tools I used to create this blog.
First, you need to create an Angular project, to do so you'll need node.js and npm installed on your
machine. You can download node.js in the official site. Installing node.js will
also install npm, that is the Nodejs Package Manager. Make sure that the executables are in your
path environment variable, normally they are added in the installation process. To verify this you can open
a terminal window after the installation and type npm -version if you see the npm version as return npm was
correctly installed, now we need the AngularCLI tool to help us create and manage our Angular projects, to install
it we will use npm, run the following command npm i -g @angular/cli this command tells npm to install (i)
globally (-g) the @angular/cli package, this will create a link to the ng executable, so we can run it
as if it is on the path, from anywhere in the terminal.
Choose your best projects folder, open it on the terminal and run the following ng new my-blog, this command
will use the @angular/cli that we install in the previous step to create a new angular project called my-blog,
you can choose other name, keep in mind that the Angular CLI will create a folder with that name where you run this
command.
The new versions of Angular CLI runs everything you need to get your project ready to run. So, if you open the
newly created directory (cd my-blog) you can already run ng serve, that is the Angular CLI command to run the
development server, and access on your browser http://localhost:4200 to see your application running on development mode.
Angular with some cool features of node.js brings us the "Live reload" feature, basically, everytime you change any
of your application files, the development server will rebuild you app and reload your browser page, so you can see
your changes almost in real time. An Angular app is composed by some files, we will not cover all of them on this post.
With these steps you are able to develop your angular application, but not your Scully blog yet. Lets setup Scully
on our project. Keep in mind that these next steps are still Angular features (modules, routes, components...)
and are not related to the Scully lib, therefore they are needed for a correct use of Scully.
First we need to create a routing-module for our application. To generate a routing module we need to run this command
ng generate module app-routing --flat --module=app, this command will add a file (app-routing.module.ts) under
the src/app directory that is the routing module of our application, to learn more please read the Angular Docs.
By now we just need to start this file with this code snippet:
import { NgModule } from '@angular/core';
import {RouterModule, Routes} from "@angular/router";

const routes: Routes = [];

@NgModule({
  imports: [RouterModule.forRoot(routes)],
  exports: [RouterModule]
})
export class AppRoutingModule {

}
I like to create some modules to keep the things well organized, these are not mandatory steps, but if you don't
want to create them I suggest you to get to the Scully docs
to learn more about. Lets create two Angular modules, home and blog.
To create these modules we will run the following commands: ng generate module home --route=home --module=app-routing
and ng generate module blog --route=blog --module=app-routing now the Angular CLI will create one directory for
each one of the modules, we will be back on these modules later. We need to provide a default route for our application,
the one that will catch the request when someone accesses our domain like mine (pigmeo.dev), to do so we need to add
one more route at the end of our routes array on the app-routing.module.ts, or just remove the home from our home route path
like this:
const routes: Routes = [
  {
    path: 'blog',
    loadChildren: () => import('./blog/blog.module').then(m => m.BlogModule)
  },
  {
    path: '',
    loadChildren: () => import('./home/home.module').then(m => m.HomeModule)
  }
];
If you run your application now, you'll see the same page as before, nothing has changed, this is because we didn't
tell angular where to "print" the routes content, for our tests, we just need to edit the app.component.html file,
delete all the content that is there and write just this code:
<router-outlet></router-outlet>Now if you run your application (ng serve) and access it (http://localhost:4200) you will see your home component
that by now has only a text "home works!", if you try to navigate to http://localhost:4200/blog you will see the blog
component that also has only one text "blog works!", if you saw this two texts, we are all set to install Scully.
One more thing, this last step (Edit the app.component.html) can be done without stopping the application, if you
already ran it after edit the routes file, you just need to edit the component file to see the changes in real time
because the live reload feature will rebuild you app when you change the component file.
Now we can set up Scully, using the Angular CLI, we just need to run the following command: ng add @scullyio/init
to install Scully on our application, note that if you are using Windows you might need to add the --skip-confirmation
parameter, for this step I recommend you to stop you application because we will add a lot of files and change others
that the live reload doesn't cover. It is important to say that what we are doing now is not related to Angular itself,
but now we are dealing with Scully stuff. After that Scully is already "installed", you'll notice that the installer
will create some files and update others, you don't need to worry about this. As we need to add blog support we
need to run this another command ng generate @scullyio/init:blog thi command only will work if you follow all the
above steps, but don't worry, if it fails you can check the Scully docs for more information.
Now you can notice that Scully adds another files and most important it creates a folder named blog with a Markdown
file inside it. This folder will hold your "post files" each one of the markdown files will correspond to a post when
you build your application, Scully has a lot of customisations available, but to gain some time and to save my keyboard
lets leave it all default by now.
Theoretically, you're all set, your blog is already "usable", you just need to build you application, and build
the static files that will be your posts. To do so, you can run the ng build command, that will build your
Angular application, and then you'll need to run the npm scully command, that will make Scully read your markdown
files and generate the static html. Now you'll have two ways of running your application, I'll cover them later, but
if you want to see your blog "working" you can run the command npm run scully:serve when Scully finish
serving the application it will give you two URLs, take the "Angular distribution" one, access it on your browser,
you'll see your home component, after that go to that one markdown file, copy the "slug" on the top of the file
and add to the URL, you'll have something like this: http://localhost:1668/blog/___UNPUBLISHED___ktdahn9i_JnXqf2Ai9S2xp7w7KobZGBFnY8PJNAVi
this URL must show the content that is in that markdown file. I won't explain how Scully works in details on
this post, if you are interested, read the docs
what you need to know now is:
- Scully will read your markdown files and will generate html static files that will be your posts.
- Scully will read the upper part of your markdown files and use this information as metadata for your posts.
- Scully works with a metadata flag that is the
publisedI'll explain this better next. - The posts slugs are customizable, you can see on the docs how to do it.
- When you publish your post, the slug will change to the one set up by you on the markdown file.
You already can see your posts, but you can only access them by the URL, lets change our home component to show
the routes for our blogs, I won't cover all the details here, we will be using RxJs Observable to capture the
Scully routes, if you want to learn more reach out to the RxJS Site. Scully provides a service
for us, so let's inject this service in our component, and just create a property called routes$ that will listen
to this observable, and get the Scully routes from the service, our home.component.ts will look like this (I remove
the imports to save some lines):
@Component({
  selector: 'app-home',
  templateUrl: './home.component.html',
  styleUrls: ['./home.component.css']
})
export class HomeComponent{

  constructor(private scullyRoutesService: ScullyRoutesService) {}

  posts$: Observable<ScullyRoute[]> = this.scullyRoutesService.available$.pipe(
    map(posts => {
      return posts.filter(post => post.sourceFile?.endsWith(".md"));
    }));

}
Basically we are getting an array of posts and filtering only the ones that have a "sourceFile" that ends with
".md" (our markdown files). Now as we are editing our Angular application, we can run ng serve and see our changes
in real time with the live reload feature. Now we can use our posts$ to show on the page our routes, but Scully
will only create a route to the published posts, to publish a post you can edit the markdown file metadata to look
like this:
---
title: my-first-post
description: 'blog description'
published: true
---
Now you need to run the npm run scully again, keep in mind that everytime you change a markdown file, you'll
need to run the npm run scully command, in order to Scully read the markdown files and build the static HTML ones.
After running the command, if you have your Angular development server running, it will auto reload and add the new
blog post route. Now you just need to add this code snippet to show a link for each of your posts on the home.component.html:
<article *ngFor="let post of posts$ | async">
  <a href="{{post.route}}">
    <h3>{{post.title}}</h3>
  </a>
</article>
Now we have a link to our posts in the home page, but if you click the link you won't see you post content, this
happens because angular doesn't know how to load the static files that Scully generates, but don't worry, when we
build the application it will work (haha).
For you be able to see you post content, we have to use a feature of Scully, open up another terminal and run
npm run scully:serve this will start a development server to serve the static files to your angular application,
now if you access your blog post again you will be able to see your post content. From this point I'll leave to
your creativity to choose (and learn if you don't) how to show your post list and how to show your blog post, play
around with the power of Sass (The default CSS processor for Angular applications) and with all the features Angular
also provides. Please note that everytime you change your markdown files you'll need to stop your scully development
server, run npm run scully, and then start it again so your static files can be updated and served.
After that you only need to build your application running the command ng build && npx scully, this will generate
a dist directory inside your project containing all the files that you'll need to deploy it. Note that we ran two
commands ng build that builds the Angular application and npx scully that is the same as npm run scully. After
running the npx scully another folder will be created called static inside the dist one, we need to use that
folder to deploy our application.
How to deploy your newly created blog
Well this part obviously is optional, you can deploy your application in any webserver of your choice but, I know this very cool and useful service called Vercel that offers us hosting for JS applications with SSL for FREE!!!! You see? I said FREEEEEEEEEEEEEEE! Yeah, and that is the only reason I could use this cool ".dev" domain. (.dev domains requires an SSL certificate)
Before we start the deploy process, you have to add some additional configuration. Add this dependency to your
package.json file under the "dependency" section: "puppeteer": "10.1.0", open the scully.my-blog.config.ts
file and add this after the "routes" object:
puppeteerLaunchOptions: {
    args: ['--no-sandbox', '--disable-setuid--sandbox'],
}
Its is very easy to deploy an application on Vercel, even more if it is a "common" application, in our case, as
we are using Scully, we just need to set up a couple of things. First, lets upload our code to github, Angular
projects already come with git set up, we just need to add an upstream to it, in my case I'll just create a
default Github repository called my-blog-example and add it as the upstream to my project and the make a push.
With our code on Github, lets get to Vercel site and Sign up. With our account created we can click on "New Project"
now if you are new to Vercel, it will ask you to connect your Github account, connect it and now you might be able
to see you git repositories to choose one, if you aren't seeing your repository click on the "Adjust Github App Permissions"
and follow the instructions there. Now you should see something like this:
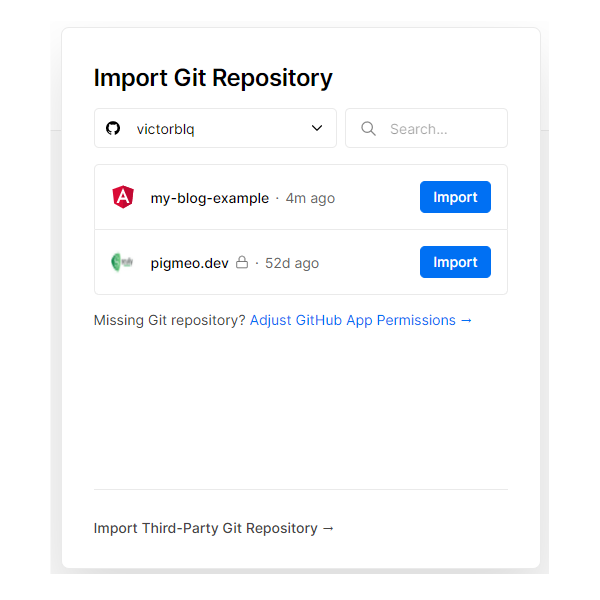
Click on the "Import" button, now we need to set up the deploy, if it asks you to create a team, just skip it, unless you want to create and begin your 14-day trial...
Give your project a name, choose the Angular framework preset, then open up the "Build and Output Settings" and edit it to look like this:

After set up these configs, click on the "Deploy" button and wait, Vercel will clone, build and deploy your application. When the process is complete you'll see a lot of confetti, and a button "Go to Dashboard", click it. There you'll have the links for your application, and that is it, everytime now when you push something to your master branch, Vercel will automatically pull the changes, build and deploy your app, easy right?
The source code I create while I was writing this article you can find on my Github
Now my child, play around, explore, learn, and build your own empire!!! Or just your blog and share your knowledge. If you read until here thank you, I hope you find this content useful. Any question you can reach out to me by the social media on the About page.